Documentation
Zotech - IT Solutions & Technology Joomla Template
Thank you so much for purchasing our product. We hope you enjoy our collaboration.
- Author: Windstripe Themes
- Created: 09 Jun, 2025
If you have any questions that are beyond the scope of this help file, Please feel free to email via My Profile Page.
Description
Zotech – IT Solutions & Technology Joomla Template
Zotech is a cutting-edge Joomla template crafted for IT service providers, startups, and tech-focused companies. It's ideal for creating websites related to IT Services, Software Development, Cyber Security, SaaS platforms, Data Mining, and Data Centers, offering a sleek and professional online presence.
With 4 modern homepage layouts and 4 flexible header styles, Zotech empowers you with unlimited creative options. It also includes essential inner pages such as Services, About Us, Why Choose Us, Testimonials, Contact, Login & Register, and multiple Blog layouts.
One of Zotech’s standout features is the integration of Dynamic Content using SP Page Builder. This allows for streamlined management of key sections like Projects, Services, and Team—enabling you to edit and update content dynamically without the need to manually recreate pages.
Optimized for speed, responsiveness, and SEO, Zotech works flawlessly across all modern browsers and devices. Its powerful features, modern design, and ease of use make it the perfect solution for building an engaging, high-performing tech website.
Zotech is based on Helix Ultimate Framework so is full responsive, fast loading, secure, and have many features. For the majority of pages we used SP Page Builder 5 (Pro) with its main addons, including some customized by us.
Installation
There are two methods you can use when installing your newly template:
- Using the quickinstall if you are starting your project from scratch.
- Using the template only if you are working on an already made website.
METHOD 1: The Quickinstall
The quickinstall package is essentially a clone of our demo preview, created with Akeeba Backup. It includes Joomla, the Zotech template, components, modules, plugins,
libraries, and everything else you see in the demo — all of which are already installed.
Follow these steps:
- Upload the contents of the quickinstall folder to your host.
- Create a fresh database in your cPanel.
-
Access the URL where you extracted the files. A restoration script including a Joomla installation should appear.
Follow the instructions, providing the necessary details to complete the installation.
- Need help? Here's an installation example: Quickinstall Method
- You're all set to start adding your content!
METHOD 2: Template Only
The template only option includes just the template — it does not install menus, components, modules, or plugins from the demo. You’ll only get a new visual layout for your website.
But don’t worry! We've included detailed instructions to help you make your site look exactly like the demo. (Please follow all the steps and check the FAQ.)
1. Start with the following steps:
-
Install Joomla by downloading it from here:
Joomla Official Website
- Installation instructions: Installing Joomla
- Beginner-friendly guide: Getting Started With Joomla
- After installing Joomla, locate the template folder in your downloaded package and find the zip file named Zotech.
-
Go to the Extension Manager and upload the template zip.
- Instructions: Using Joomla Extension Manager
- For Joomla 4 & 5: Joomla 4 Extension Manager
- If everything went well, you're ready to move to the next chapter.
2. Now that Joomla and the template are installed, let's configure it.
- Ensure the Zotech template appears in your templates list.
-
Set the newly installed template as default.
- Instructions: Switching templates
- For Joomla 4 & 5: Site Template Styles
- Great job so far! You should now have the template up and running.
3. Now let's install the components and modules used in the demo.
- In the downloaded package, open the extensions folder and install all included extensions.
- Additional links to free extensions are provided in a text file.
4. You now have all the tools. Next, import the settings to match the demo look (follow all steps carefully).
You can choose which files to import. Below are the steps for importing different files from the import folder:
-
Installing Template Settings:
- Locate the template settings files in the theme settings folder.
- In the admin panel, go to Templates → Site Templates Styles.
- Click on Zotech - Default.
- Click on Template Options.
- Go to the Advanced tab (last option).
- Select Import & Export.
- Click Import Settings.
- Select the Zotech - Default.json file from the theme folder inside import.
- Video guide: Import template settings
-
Inserting a page in Page Builder:
- Find the SP Page Builder page files in the page builder folder.
- In the admin panel, go to Components → SP Page Builder Pro → Pages.
- Click + Add New Page and name your page.
- Click Import.
- Select a .json file from the import → page builder folder.
- Video example: Importing a Page Builder page
-
Inserting a module in Page Builder Modules:
- Find the SP Page Builder modules in the page builder - modules folder.
- In the admin panel, go to Modules.
- Click + New.
- Select SP Page Builder from the list.
- Give your module a name and assign it to a position if needed.
- Save.
- Click Edit with Backend Editor.
- Click IMPORT and select a page from the .json module list you received.
- For blog and/or portfolio items, enable Integrations under Components → SP Page Builder Pro for Joomla Article and SP Simple Portfolio.
- Video example: Importing modules and enabling integrations
- All done! You should now have everything up and running. If you encounter any issues, check the FAQ for tips and troubleshooting.
- We also have a step-by-step video tutorial for importing our Joomla templates: How to install our Joomla templates
5. Working with SP Page Builder's Dynamic Content Feature (OPTIONAL).
Dynamic Content is a new feature of SP Page Builder - you can see how it works here. Unfortunately in this early releases you cannot import/export dynamic content items. If you want to make dynamic content items look like in the demo, you need to check the quickinstall and recreate the presets from it.
-
Starting to use Dynamic Content:
- In the admin panel, go to Components - SP Page Builder - Dynamic Content.
- Click on Add New Collection.
- Add the Custom Fields you see in the quickinstall or the ones you need Add Custom Fields.
-
Inserting the collection in our template:
- Import the page made with Dynamic Content from our import folder (check above the Inserting a page in Page Builder section.
- In the page you will see a collection addon with no source. Just add to the Source your created collection.
- All done! You should now have the collection looking like in the demo.
We know it's a bit of extra work needed in order to make the dynamic content items work, but we consider it to be a powerful feature of Sp Page Builder. However, you may not prefer this feature and that's why we started a poll: Would you rather we make the pages like Services, Projects, Team using the new Dynamic Content of SP Page Builder or using the classic way - One SP Page Builder page for the listing and One Sp Page Builder page for the Item Details? We would like your feedback on this matter in order to make the templates as good for you as possible.
Updating the Template
It is very simple to update our template. Here are the steps:
- Make a full backup of your website.
- Update all extensions to the latest version.
- Update the template to its latest version.
- Update Joomla to the latest version.
- Clear the cache.
Issues with the pre update checker?
Please check this link: Understanding the difference between our Template version and Helix Ultimate version
Template Customization
All our styles are organized in a way that makes them easy to change. You can see instructions on how to do so below:
- GENERAL, HEADER, FOOTER → custom.css file
- You can find our general styles (for different components, blog, shop, font imports, Page Builder rows or columns), as well as header and footer styles, in the custom.css file.
- To edit it, go to Your Host → templates → our template → css → custom.css
- We may also include some custom CSS from Page Builder in this file — styles that couldn't be applied directly through the Page Builder addon's custom CSS.
- HINT: Using browser developer tools to find styles.
- GENERAL, HEADER, FOOTER → Page Builder's Page CSS
- If a page in our template uses the same Helix template layout but needs a different style (e.g., different menu, footer, background, or fonts), instead of creating a template child — which might confuse users — we apply the CSS in the page's own custom CSS section.
- To edit it, go to the top of the page → on the left, click on Custom CSS → edit CSS (see image below)

- PAGE BUILDER ADDONS
- Each addon in Page Builder has its own custom CSS section, which we’ve used.
- You can change it anytime by going to SP Page Builder → Pages → Select page → Edit addon → Go to the STYLE tab and scroll down to find the Custom CSS section (see image below).

Layout
Configuration for the Zotech Template
In the administrator panel, go to Templates - Site Templates Styles - click on our template - click on Template Options.
- Basic
- 1. Logo - Logo type image; you can upload your image here or select TEXT and add your text.
- 2. Header - Choose favicon, sticky header, and favicon.
- 3. Body - Here you can choose a preloader or a boxed layout.
- 4. Footer - Here you can enable the "go to top" button (we insert the footer as a Sp Page Builder module, which you can easily import—it's more flexible this way. You can find or insert it in position footer1).
- Presets
- Here there are 8 predefined presets from the original template, plus one or more created by us. Choose the color you want.
- Layout:
- Here you can create your site layout.
- You can create one layout or more layouts: if you want to create a new/different layout, you need to duplicate your template style and then build your layout.
- The best idea is to install our demo on a subdomain and check how it's configured.
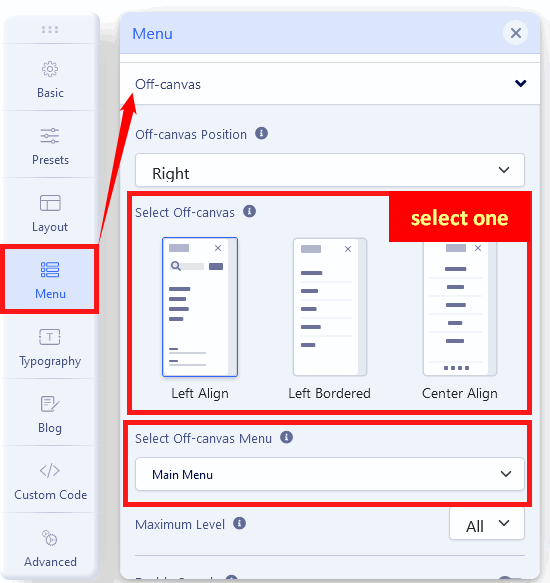
- Menu:
- Here you can have 3 options: Menu Builder, Mega Menu, and Off-canvas (just icon).
- Menu Builder: You can create your own menu, set up the mega menu, or select an icon for the menu item.
- Mega Menu: You can select the Menu Type here.
- Off-canvas: Make sure you select the Off-canvas alignment (the menu will not show up if you do not) and select the menu you want for the off-canvas position.
- Custom Code Tab:
- Here you can add your custom CSS and JS.
HOW WE WORK WITH HELIX ULTIMATE: You can see exactly how we work with Helix Ultimate and what settings from it we use HERE.
Extensions
Here are the official descriptions of the extensions used in our templates.
- SP Page Builder 5 PRO
- Helix Ultimate 2 Framework
- Akeeba Backup
- OPTIONAL: Hikashop
- OPTIONAL: J2 Store
- OPTIONAL: SP Simple Portfolio
- OPTIONAL: Creative Slider
IMPORTANT!
You do NOT need to purchase any extension in order to work with our template.
FAQ
We have provided answers to a few frequently asked questions here to help you better understand our template.
Source & Credits
Images:
- Unsplash - https://unsplash.com/
- Freepik - https://freepik.com/
- Picjumbo - http://picjumbo.com/
- Pexels - https://www.pexels.com/
- Pixabay - https://pixabay.com/
Fonts:
- Google Fonts - https://fonts.google.com/
- Icons Font Face - https://fontawesome.com/
Components & Framework:
- SP Page builder 5 PRO
- Helix Ultimate 2 Framework
- Akeeba Backup
- OPTIONAL: Hikashop
- OPTIONAL: J2 Store
- OPTIONAL: SP Simple Portfolio
- OPTIONAL: Creative Slider
Support
If this documentation doesn't answer your questions, please send us an email via Our Email Address
We may be located in different time zones, but rest assured, we answer all questions as soon as possible, whether it's the weekend or weekdays. However, there are some rare cases when we may not receive your emails. If you do not get a reply from us within 24 hours, please write to us again or comment in the purchased item section of ThemeForest. Please note that some delays may occur during holiday seasons.
Don’t forget to Rate this template
Go to your ThemeForest Profile > Downloads Tab > then you can rate & review our template.
Thank you.
For Future Updates Follow Us @themeforest / @facebook / @twitter /